Sometimes, PCs windows get corrupted or some virus or malware attacked your computer due to which it stopped working properly and start creating problems. Sometimes, the situation worsened and you need to reinstall your Window, or if you want to upgrade your window then before reinstalling your Window or upgrading your window, it is advised to do a clean installation of Windows 10.
How to do a Clean Install of Windows 10 Easily
Clean Installation of Windows 10 means to erase everything from PC and install a new copy. Sometimes, it is also referred to as a custom install. It is the best option to remove everything from the computer and hard drive and start everything from scratch. After a clean install of Windows, the PC will act as a new PC.
How to do a Clean Install of Windows 10 Easily 1. Prepare Your Device For Clean Installation a. Backing up your important data b. Downloading device drivers c. Knowing Windows 10 system requirements d. Checking Windows 10 activation e. Purchasing a Product key f. Disconnecting non-essential attached devices 2. Create USB bootable media 3. How to Perform a Clean Installation of Windows 10 4. Completing Out-Of-Box-Experience 5. After Installation tasks
Clean Install of Windows will help to get rid of below problems:
Solve the problem of computer performance and other issues Quickly resolve startup and shut down problems Resolves memory usage and app issues Helps to get rid of any virus or malware Get rid of corrupted files Fix system corruption Improves battery life Remove all the unwanted settings, files, and apps
It is always suggested to do a clean install when you are upgrading your Windows say from the previous version to a new version as it will protect your PC from bringing any unwanted files and apps that later may damage or corrupt your windows. Clean Install is not difficult to perform for Windows 10 but you should do it by following proper steps as any incorrect step may cause serious damage to your PC and Windows. Below provides a proper step by step process to properly prepare and perform a clean install on Windows 10 for whatever reason you want to do it.
1. Prepare Your Device For Clean Installation
The most important thing to keep in mind before performing a clean install is once the clean install is completed, all the work you have ever done using the operating system will be gone and you can never get it back. All the apps you have installed, all the files you have data, all the precious data you have saved, everything will be gone. So, it is important to back up your important data before starting a clean installation of Windows 10. Preparing a device does not involve only backing up of important data, there are some other steps which you need to follow for smooth and proper installation. Below are given those steps:
a. Backing up your important data
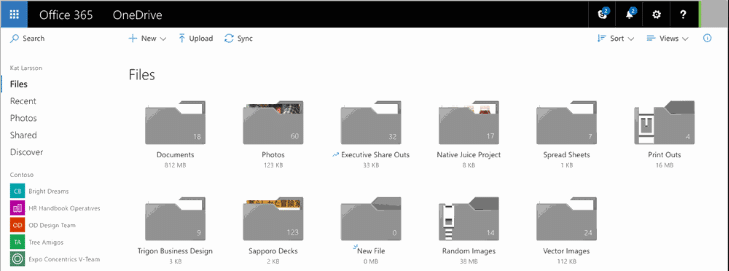
As you know the installation process will delete everything from your PC so it is better to create a backup of all the important documents, files, images, videos, etc. You can create a backup by uploading all the important data on OneDrive or on cloud or in any external storage which you can keep safe. To upload files on OneDrive follow below steps:
Click on Start and search for OneDrive using the search bar and hit the enter button on the keyboard. If you do not find OneDrive, then download it from Microsoft. Enter your Microsoft email id and password and click on next. Your OneDrive folder will be created. Now, open FileExplorer and look for the OneDrive folder on the left side and open it. Copy and paste your important data there and it will automatically sync with OneDrive cloud by the client in the background.
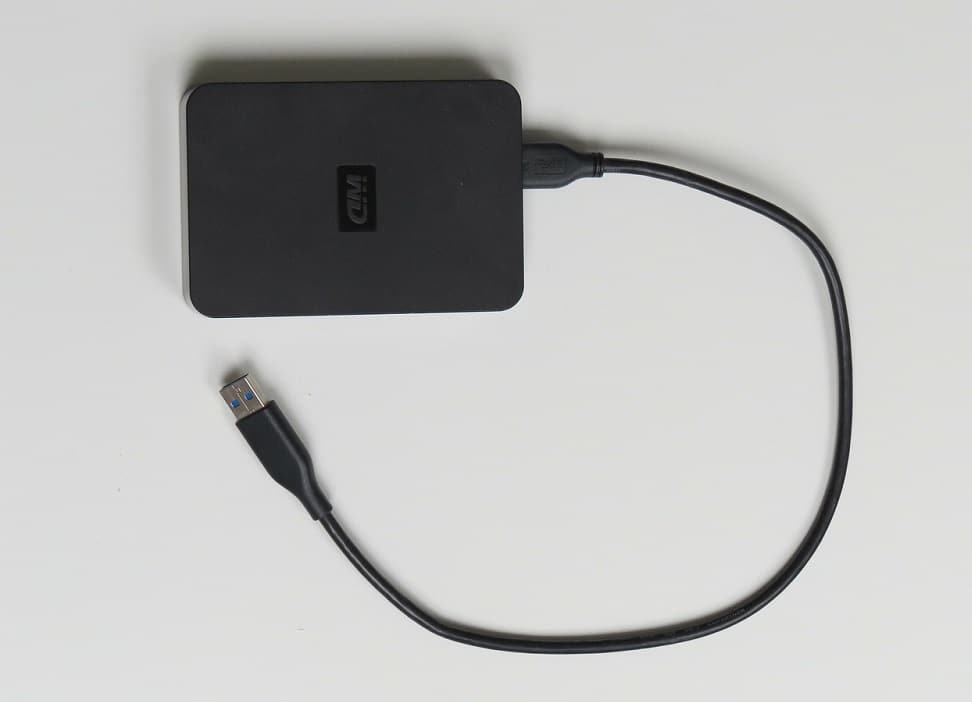
To store files on external storage follow the below steps:
Connect an external removable device to your PC. Open FileExplorer and copy all the files you want to create a backup of. Locate the position of a removable device, open it, and paste all the copied content there. Then remove the removable device and keep it safe.
Also, noted the product key for all the apps you have installed so that you can reinstall them later. Also Read: 6 Free Tools To Backup Data In Windows 10
b. Downloading device drivers
Although, setup process itself can detect, download and install all the device drivers but it may possible that some drivers may not get detected so it is advised to download and install all the latest drivers to avoid the problem later. To download the latest drivers follow the below steps:
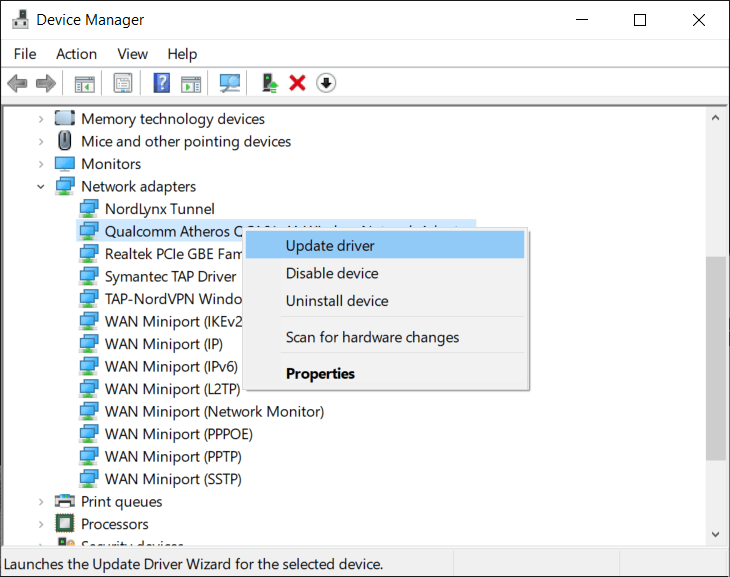
Open start and search for Device Manager using the search bar and hit the enter button on the keyboard. Your Device Manager which consists of information on all the software and hardware will open up. Expand the category for which you want to upgrade the driver. Under it, right-click the device and click on Update driver. Click on Search automatically for updated driver software. If there will be any newer version of the driver available, it will install and download automatically.
c. Knowing Windows 10 system requirements
If you are doing a clean install so that you can upgrade Windows 10, then its most probable that the new version will compatible with current hardware. But what if you upgrade Windows 10 from Windows 8.1 or Windows 7 or other versions, then it may possible that your current hardware may not support it. So, before doing so it is important to look for the requirements of Windows 10 for hardware to upgrade it. Below requirements should be fulfilled to install Windows 10 in any Hardware:
It should have a memory of 1GB for 32-bit and 2GB for 64-bit. It should consist of a 1GHZ processor. It should come with a minimum of 16GB storage for 32-bit and 20GB for 64-bit.
d. Checking Windows 10 activation
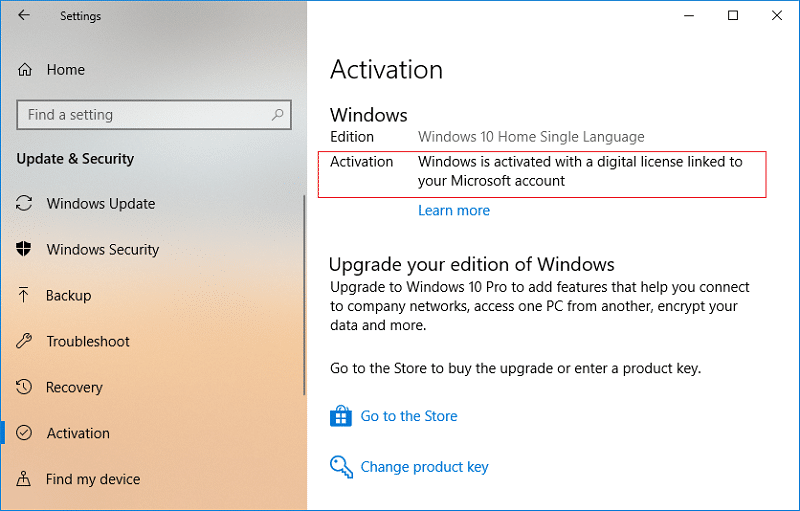
Windows up-gradation from one version to another requires to enter the product key during setup. But if you are performing clean install to upgrade Windows 10 from Windows 10 or want to reinstall windows 10, then you need not enter the product key again during the setup as it will reactivate automatically when it will be connected with the Internet after complete installation. But your key will be activated only if it was previously properly activated. So, it is preferred before clean install to check that your product key is properly activated. To do so follow the below steps:
Open settings and click on Update and Security. Click on activation available on the left side. Under windows look for the Activation message. If your product key or license key is activated it will be showing the message “Windows is activated with a digital license linked to your Microsoft account”.
e. Purchasing a Product key
If you are doing a clean install to upgrade Windows from the older version i.e. from Windows 7 or from Windows 8.1 to Windows 10 then, you will need a product key that will be asked to input at the time of set up. To get the product key you need to purchase it from Microsoft Store using below links:
Buy Windows 10 Pro license Windows 10 home license
f. Disconnecting non-essential attached devices
Some removable devices like printers, scanners, USB devices, Bluetooth, SD cards, etc. are attached to your computers which are not required for a clean install and they may create a conflict in the installation. So, before beginning the process of clean install you should disconnect or remove all the non-required devices.
2. Create USB bootable media
After preparing your device for clean Installation, another thing you need to do to perform clean install is to create USB bootable media. The USB bootable media which can be created using Media Creation Tool or using third party tool like Rufus.
Once the above steps are completed, you can remove the attached USB flash drive and can use it to perform a clean install of any Windows 10 whose hardware meets the required requirements. If you are not able to create USB bootable media using the Media creation tool then you can create it using third-party app RUFUS. To create USB bootable media using third-party tools Rufus follow below steps:
Open the official web page of Rufus using your web browser. Under download click on the link of latest release tool and your download will start. Once completed downloaded, click on the folder to launch the tool. Under Device select USB drive which has at least 4GB space. Under Boot selection, click on Select available on right. Browse to the folder which contains Windows 10 ISO file of your device. Select the image and click on Open button to open it. Under Image option, select Standard Windows installation. Under the Partition scheme and target scheme type, select GPT. Under the Target system, select the UEFI option. Under the Volume label, enter the name for the drive. Click on Show advanced format options button and select Quick format and Create extended label and icon files if not selected. Click the Start button.
After completing the above steps, USB bootable media will be created using Rufus.
3. How to Perform a Clean Installation of Windows 10
Now, after performing the above two steps of preparing the device and creating USB bootable, media, the final step remains is a clean installation of Windows 10. To start the process of a clean install, attach the USB drive in which you have created USB bootable media to your device in which you are going to perform a clean installation of Windows 10. To perform a clean install of Windows 10, follow the below steps:
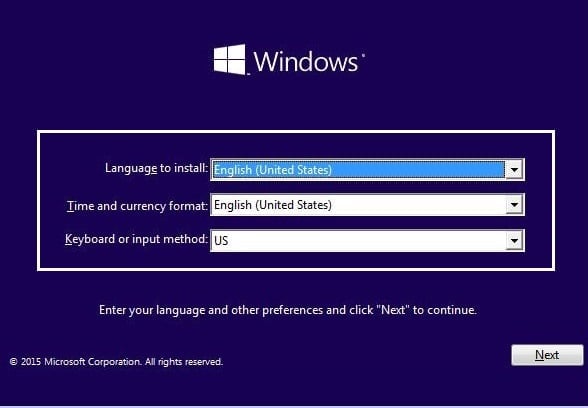
- Start your device using USB bootable media which you will get from a USB device that you just attached to your device. 2. Once the Windows setup opens up, clean on Next to proceed.
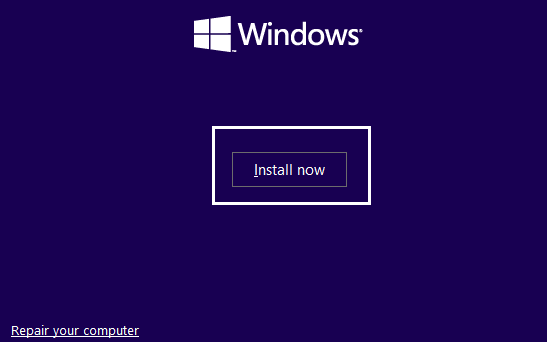
3. Click on Install now button which will appear after the above step.
4. Now here it will ask you to Activate windows by entering the product key. So, if you are installing Windows 10 for the first time or upgrading Windows 10 from older versions like Windows 7 or Windows 8.1 then you need to provide the product key which you have purchased using the links given above. 5. But, if you are reinstalling Windows 10 due to any reason then you don’t need to provide any product key as you have seen earlier that it will be automatically activated during set up. So to complete this step you simply need to click on “I don’t have a product key”.
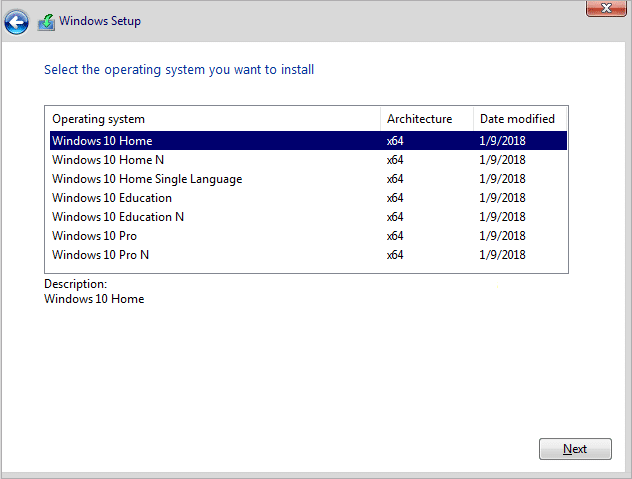
6. Select the edition of Windows 10 which should match the product key which activates.
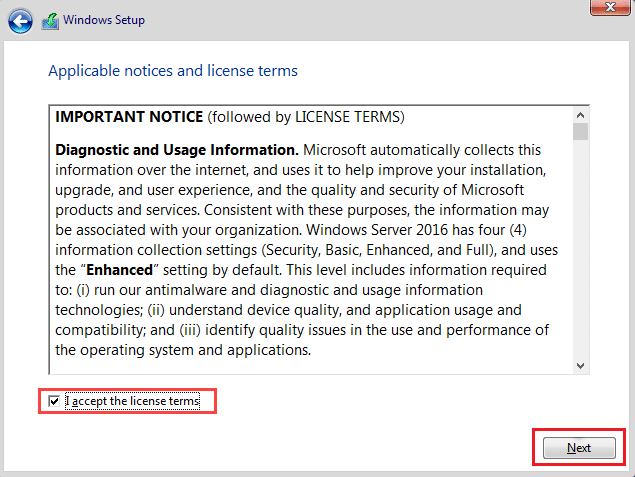
Note: This selection step is not applicable to every device. 7. Click on the Next button. 8. Checkmark “I accept the license terms” then click Next.
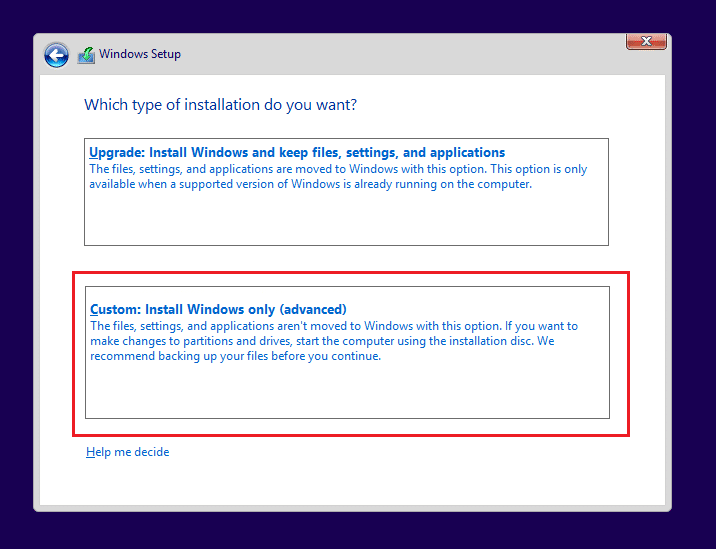
9. Click on Custom: Install Windows only (advanced) option.
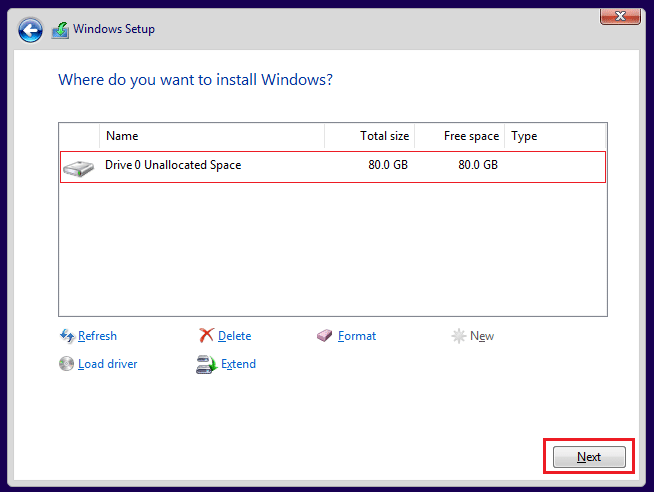
10. Various partitions will be shown. Select the partition in which the current window is Installed (generally it’s Drive 0). 11. Below several options will be given. Click on Delete to delete it from the hard drive. Note: If multiple partitions are available then you need to delete all the partitions in order to complete the clean install of Windows 10. You need not worry about those partitions. They will be automatically created by Windows 10 during Installation. 12. It will ask for confirmation to delete the selected partition. Click on Yes to confirm. 13. Now you will see all your partitions will be deleted and all the space is unallocated and available to use. 14. Select the unallocated or empty drive then click Next.
- Once the above steps are completed, your device is cleaned and now setup will proceed to install Windows 10 on your device. Once your Installation will be completed, you will get a fresh copy of Windows 10 without any trace of it being used earlier.
4. Completing Out-Of-Box-Experience
After the complete installation of a new copy of Windows 10, you need to complete out-of-box-experience (OOBE) to create a new account and to set up all the environment variables. OOBE used is depended on which versions of Windows 10 you are installing. So, choose OOBE according to your Windows10 version. To complete out-of-box-experience follow below steps:
First, it will ask you to select your region. So, first, select your region. After selecting your Region, click on the Yes button. Then, it will ask about the keyboard layout if it is right or not. Select your keyboard layout and click on Yes. If your keyboard layout does not match from any given above then, click on Add layout and add your keyboard layout and then click on Yes. If you found your keyboard layout among the above options then simply click on skip. Click on Set up for personal use option and click on Next. It will prompt you to enter your Microsoft account details like email address and password. If you have Microsoft account then enter those details. But if you do not have Microsoft account then click on create an account and create one. Also, if you do not want to use Microsoft account then click on Offline account available at the bottom-left corner. It will allow you to create a local account. Click on the Next button. It will ask you to create a pin that will be used to unlock the device. Click on Create PIN. Create your 4 digit pin and then click Ok. Enter your phone number by which you want to link your device to your phone and then click on the send button. But this step is optional. If you do not want to link your device to phone number skip it and can perform it later on. If you do not want to enter phone number click on Do it later available at bottom-left corner. Click on the Next button. Click on Next if you want to set up OneDrive and want to save all your data on Drive. If not then click on Only save files to this PC available at bottom-left corner. Click on Accept to use Cortana otherwise click on Decline. If you want to access your activity history across devices then enable a timeline by clicking on Yes otherwise click on No. Set all the privacy settings according to your choice for Windows 10. Click on the Accept button.
Once the above steps will be completed, all settings and installation will be completed and you will directly reach to desktop.
5. After Installation tasks
Before using your device, there are some steps left which you need to complete first. a) Check for Activated copy of Windows 10 1. Go to settings and click on Update and Security. 2. Click on Activation available on the left side.
3. Confirm that Windows 10 is activated or not. b) Install all the Updates 1. Open settings and click on Update and Security. 2. Click on Check for Updates.
3. If any updates will be available, they will download and install automatically.
Now you are good to go and can use newly upgraded Windows 10 without any issues. More Windows 10 resources:
Fix Windows 10 Stuck in a Reboot Loop Fix Windows 10 won’t download or install updates Fix Windows Firewall problems in Windows 10
That’s the end of the tutorial and I hope by now you will be able to perform a clean install of Windows 10 using the above-listed steps. But if you still have any questions or would like to add anything then feel free to reach out using the comment section.



![]()

![]()


