Apple AirPods Pro are undoubtedly some of the hottest pieces of tech right now. But for new users who don’t know how they work, they can get confusing. Unfortunately, the AirPods line is not as intuitive as other headphones especially with the lack of obvious buttons and symbols. Without knowing how the AirPods controls work, you can sometimes disrupt your song or call by triggering commands without meaning to. Or, you may also find it annoying to have to constantly pull your phone out and manually adjust the settings there instead of just on the AirPods. In this article, we’ll discuss the different AirPods Pro controls and features. We’ll also give you some other tips and tricks so you can maximize how you use them.
Where Are The AirPods Pro Controls?
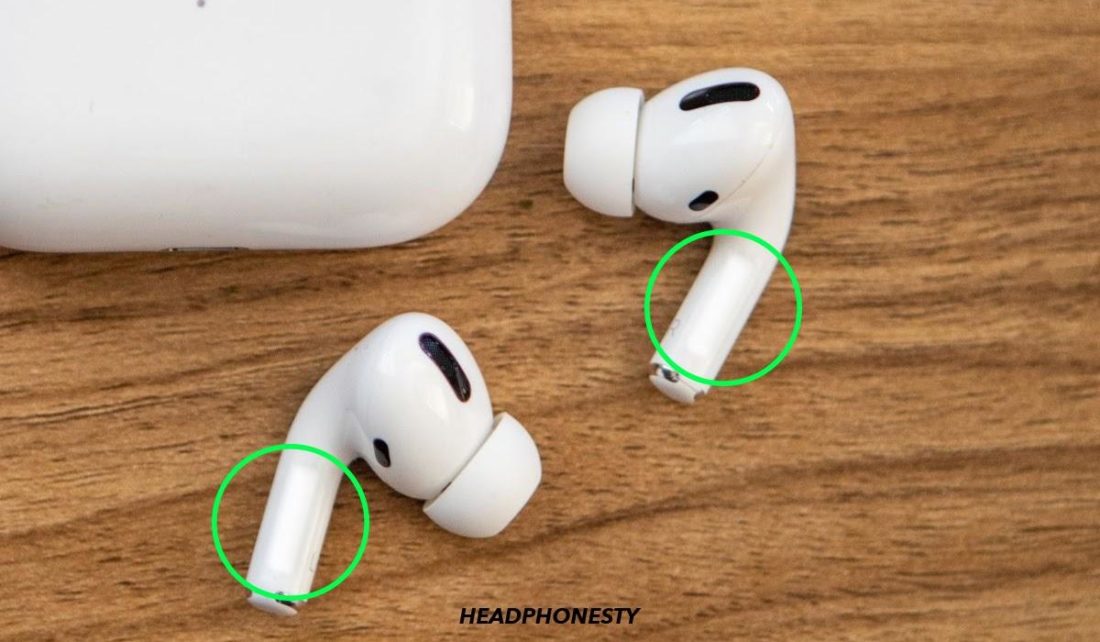
Unlike other headphones, the AirPods do not have buttons to change the volume and adjust playback. This is because the AirPods are so small that there is no space to add all of these. Of course, there is still a way to control the AirPods even without the buttons, but this control has changed over time. For instance, in the 1st and 2nd generation of AirPods, you had to double-tap it to activate a function. However, this is limited to a single function (ex. play/pause audio), so most of the controls still had to be adjusted on your phone. To counter this, Apple created the force sensor feature. This permits the user to activate multiple functions without using buttons. The force sensor is found in the flat, indented part of the AirPod stem. You can activate it by tapping (or squeezing) that part on either AirPod. The force sensor can do different things based on your customization. Basically, it allows you to fully control your audio without using your phone. Here is the list of actions you can perform by squeezing the force sensor:
Adjust audio playback Activate noise cancellation and transparency modes Answer calls Activate Siri
Audio Playback Controls in AirPods Pro
Despite their advanced uses, the main purpose of AirPods is still for music listening. With the force sensor, you can easily access the audio playback controls from either of your AirPods Pro. The corresponding function depends on how many times you squeeze it.
How to play/pause music
You can play and pause your audio by squeezing the force sensor once.
How to skip music
The force sensor also comes in handy when you want to skip songs with AirPods Pro. If you don’t like the song that just came up on your playlist, squeezing the force sensor twice will skip the current track forward. To fast forward in the current track, the user should squeeze the force sensor twice and keep holding on the second squeeze.
How to rewind music
If you want to go back to the previous track, you can squeeze the force sensor thrice. To rewind the current track, you should squeeze the force sensor thrice and keep holding on the third squeeze.
Noise Cancellation and Transparency Mode Controls in AirPods Pro
Apple included three noise-control modes in the AirPods Pro: Active Noise Cancellation (ANC) mode, Transparency mode, and Off. The ANC mode enables users to tune out from their surroundings by actively reducing ambient noise, particularly low-frequency sounds such as the humming of engines. ANC uses small microphones in the AirPods to detect unwanted external sounds, which travels through sound waves. It then creates the opposite sound waves, so that the unwanted sound is effectively canceled before they reach your ear. In comparison, Transparency Mode does the exact opposite of ANC. It does not block external noise, but rather amplifies it and actively feeds it to the AirPods’ speakers so the user can hear them. It makes it seem like you’re not wearing any earbuds at all so that you can still be aware of the sounds around you, which is especially useful for crossing busy roads.
How to turn ANC and Transparency Mode on/off
Your environment changes all the time. Sometimes you want to block off the outside world, and other times you want to hear it clearer. The AirPods Pro allow you to do both, and this is how to do so:
AirPods Pro Controls for Calls
The AirPods are not just for listening to music or podcasts. They’re also very useful when you want to make or take a call but you don’t want to hold your phone to your ear. This is especially helpful during long conversations. With the AirPods Pro, you can also decline an incoming call, end the current one, or answer a second call. Here’s how:
Make and answer calls
To make a call using AirPods and an iPhone/iPad with a cellular network, say “Hey Siri” and then say something along the lines of “Call Tommy”. On iPads with only WIFi settings, you can say “Make a FaceTime call with Paula”. But, to answer and end calls, you just have to squeeze the force sensor on either AirPod once.
Decline a call
If someone is calling and you don’t want to answer, you can decline the call by pressing the force sensor on either AirPod twice. This will send the call directly to voicemail, if you have one.
Answer another call
If someone calls you while you’re already in a call, squeeze the force sensor once to put the first call on hold and answer the second one. To switch between calls, squeeze the force sensor once again. And, if you want to end the first call and transfer to the second one, squeeze the force sensor twice.
How to Activate Siri Using the Force Sensor
For a non-living being, Siri is pretty well known. Apple’s virtual assistant is part of the operating system for iPhones, iPads and Macintosh computers and can be called on by saying “Hey Siri”. Users call on Siri to get information and do tasks on their iPhones/iPads. These include answering questions, creating calendar events, playing music, and even sharing information with your phone contacts. You can even have Siri announce your calls or notifications as they arrive. There are two ways you can use Siri with your AirPods Pro– this is through voice recognition, and by pressing the force sensor. For voice recognition, just say “Hey Siri” and say what you want it to do. For example: “Hey Siri, what is the weather like today?” Otherwise, you can squeeze the sensor on either AirPod, wait for the chime, and then ask it to do the task.
Can You Customize the Force Sensor in AirPods Pro?
Yes, you can customize the force sensors to an extent. Yet, there are some default settings that you cannot change:
Single tap for play/pause Double-tap for skipping songs Triple-tap for going back to the previous track.
Aside from those, you can change what the left and right AirPods control, and the force sensor settings (i.e. press speed and press duration).
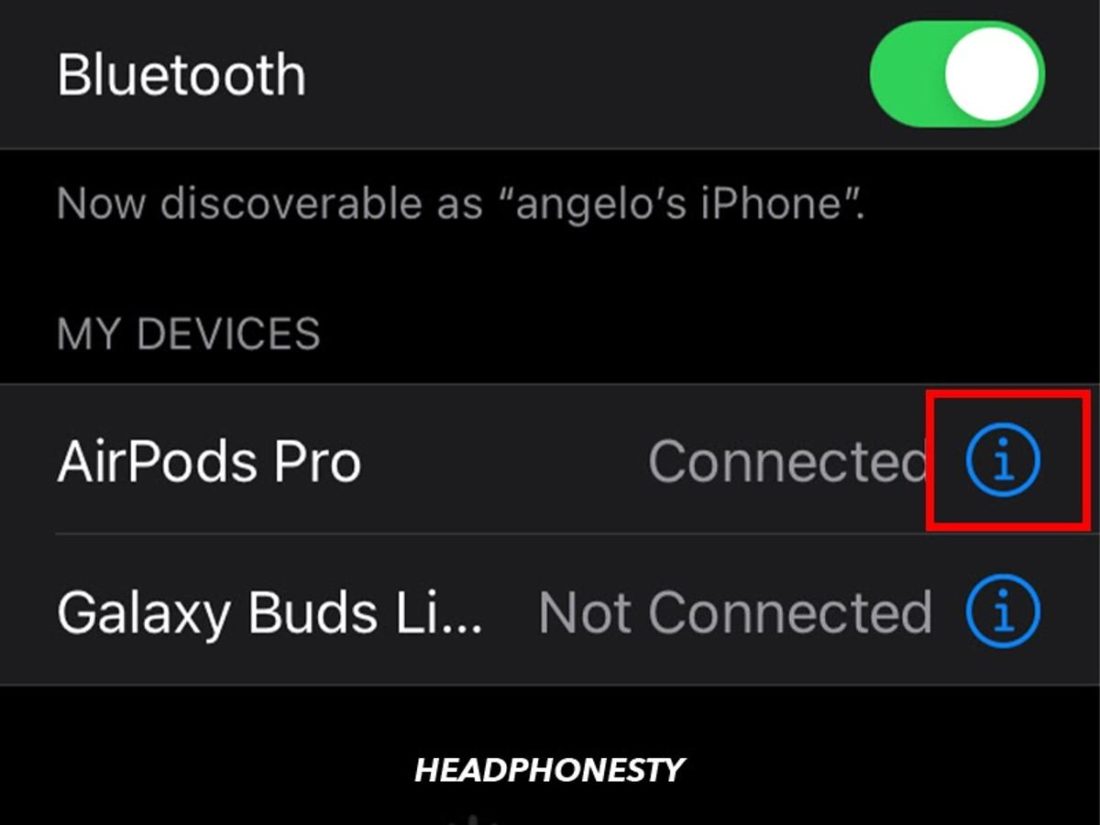
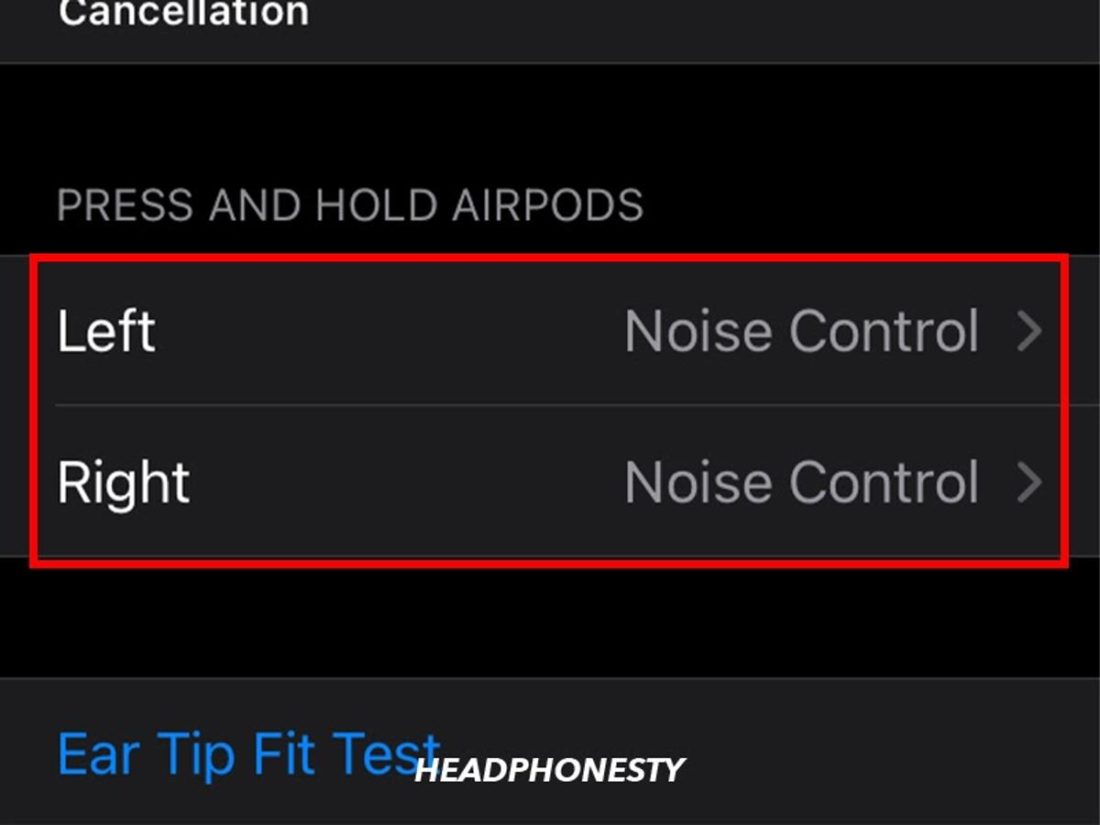
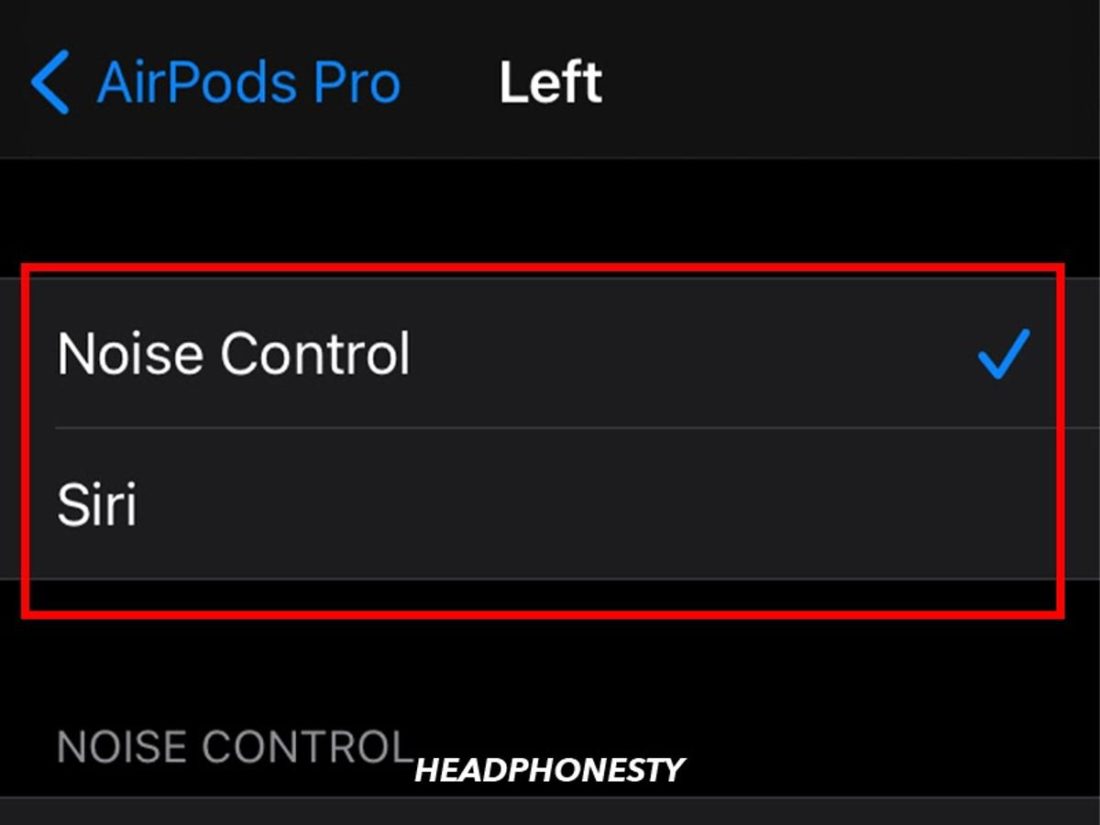
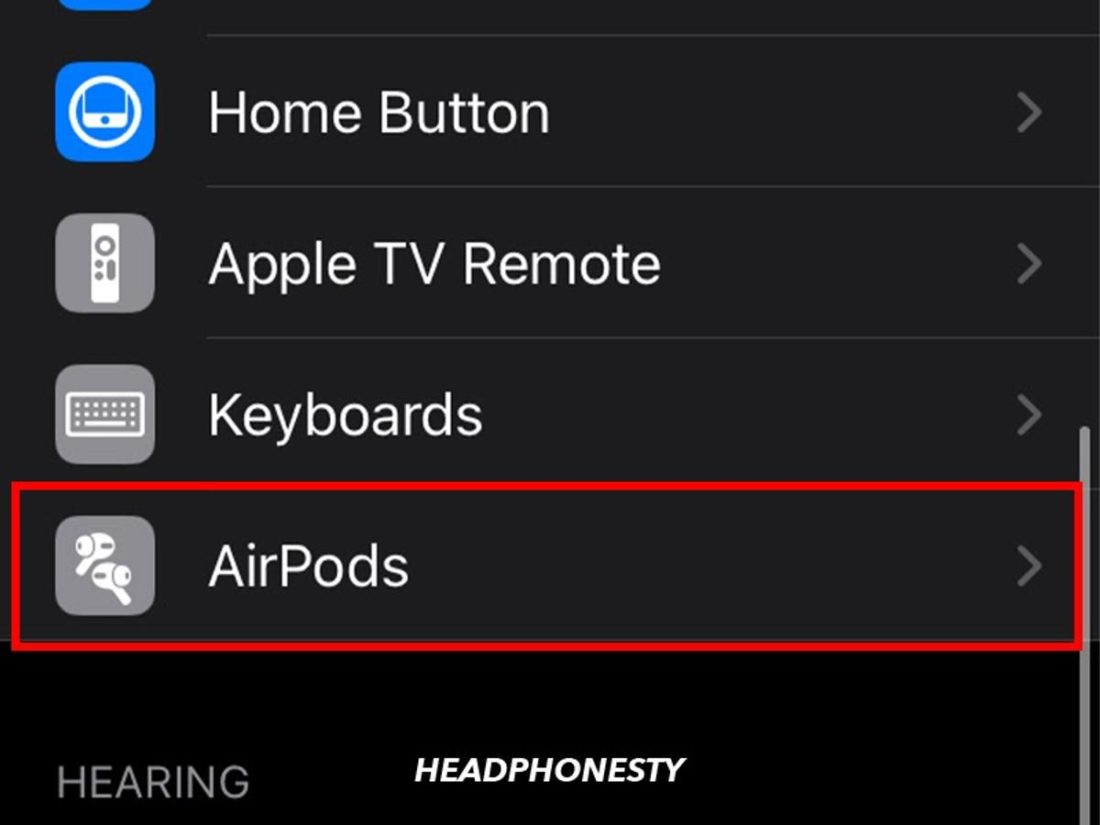
How to change left and right AirPods controls
As stated above, a long press on the force sensor allows you to either change the noise control mode or activate Siri. But you can also do both by setting up each AirPod so that one of them switches the noise control modes while the other activates Siri after a long press. Here’s how to do that using your iPhone:
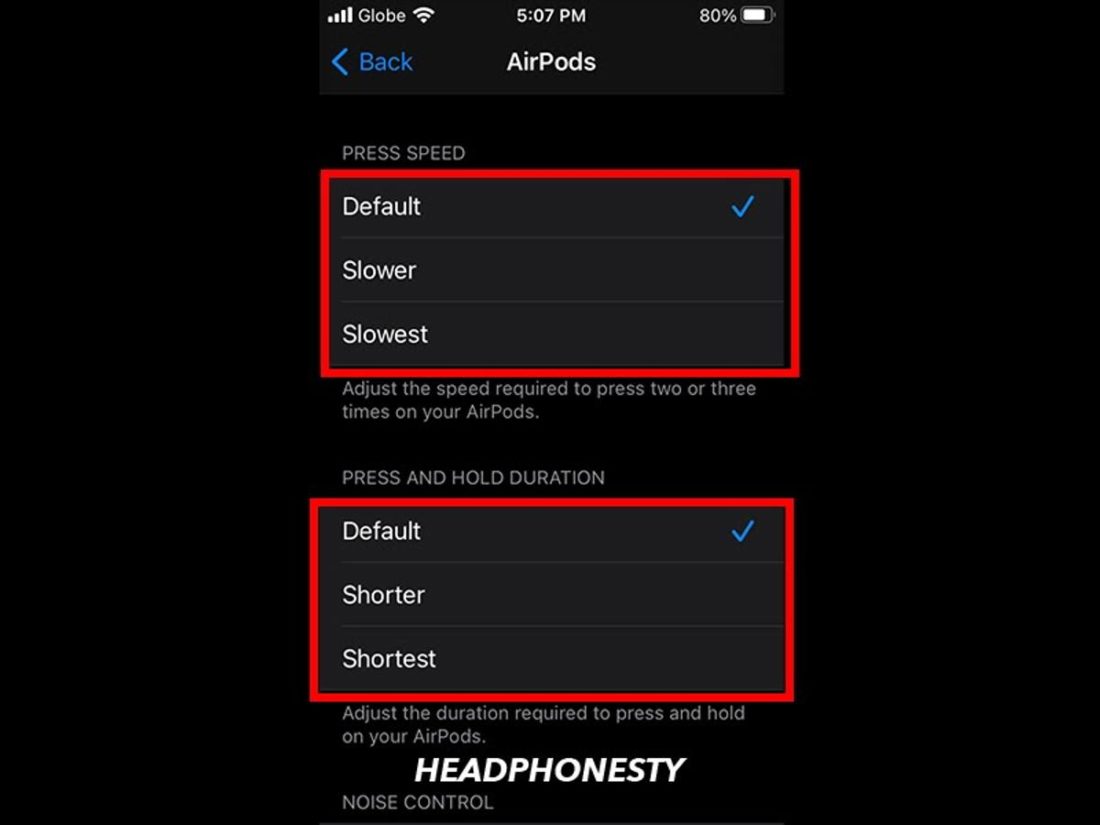
How to adjust press speed and duration
We all have different levels of dexterity and mobility. As such, Apple made it possible to change the speed and duration it takes before the force sensor reacts. This is especially beneficial for users who struggle with mobility. They may not be able to squeeze the force sensor quickly and therefore have a hard time with double or triple taps. Here are the steps to change the press speed and duration of the force sensors:
Conclusion
Using the Apple AirPods Pro may seem confusing at first, but it’s not actually complex. With the force sensor, you can completely control your audio on the AirPods themselves and without bringing out your phone. Through this cheat sheet, we hope that you now know more about the AirPods Pro and how easily you can customize your listening experience to your liking. What do you think? Did you find this cheat sheet helpful? Not really? Do you think we missed something? Tell us in the comments below!
![]()